Type 1 Diabetes
- Type 1 diabetes is when your body stops making insulin
- We all need insulin to live
- People with Type 1 diabetes take insulin every day to stay happy and healthy
Type 1 diabetes means that your pancreas has stopped making insulin
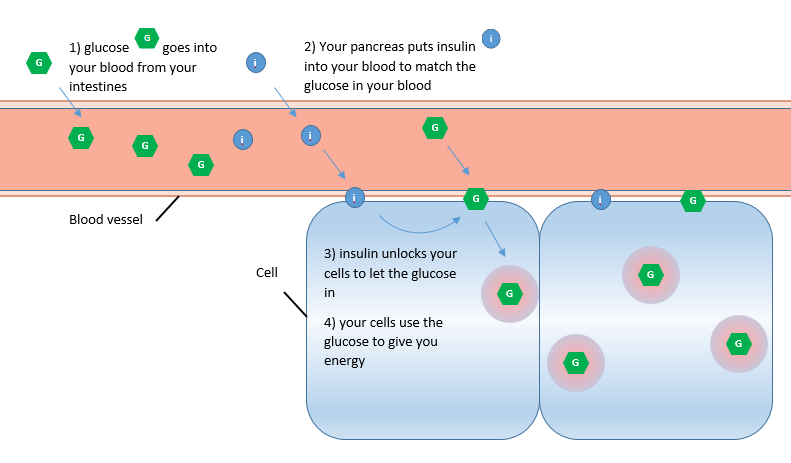
Insulin is very important, it helps your body change food into energy – this is how it works:
- When you eat, your body breaks the food down.
- Most food has carbohydrate in it.
- Your stomach breaks down carbohydrate into a sugar called glucose. The glucose goes from your intestines into your blood.
- The glucose travels all round your body in your blood.
- Insulin lets the glucose move out of your blood and into all the places where it’s needed.
- Every single part of your body uses glucose to work properly: Your heart needs it to beat, your brain need it to think and your muscles need it to move.
- If you don’t have enough insulin, your body can’t use the glucose that is in your blood.
- When this happens you get tired from lack of energy.
- You also get thirsty and wee a lot because your body is trying to “wash” the extra sugar out of your blood.
- If you don’t get the insulin you need, you can become very poorly
We in the Children’s Diabetes team, are here to help you manage your type 1 diabetes.
In the next section you will see how you can help your body to get the insulin it needs so that you can stay fit and well.
How did I get Type 1 diabetes?
- You can’t catch Diabetes from someone else and you can’t give it to someone else either!
- Type 1 diabetes is not caused by anything you do.
- It is not your fault that you have Type 1 and there is no way you could have prevented it.
We don’t know why some people get Type 1 diabetes and some don’t
We know that you definitely can’t catch type 1 diabetes from someone else. We know that sometimes a virus can trigger Type 1 and sometimes it runs in families.
Researchers are working hard to understand why Type 1 happens to some people and how we can cure it.
Managing Type 1 Diabetes
- Take insulin every day, usually 4 times a day:
- Take basal insulin once a day at bedtime
- Take bolus insulin 10-15 minutes before each meal
If you have type 1 diabetes you need to give yourself insulin.
There are different ways to take insulin. Here in Bedfordshire Hospitals Trust, we use a system called a basal-bolus regime because it works very well.
With the basal-bolus regime you take two types of insulin every day:
Basal insulin
The first type of insulin is called basal insulin. Basal means “base”. This insulin gives you a firm base of energy for the day.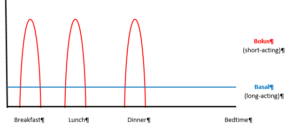
You normally take basal insulin once a day. It gives you a constant low level of insulin and it lasts for 24 hours (all day and all night).
Basal insulin makes sure that your body has access to glucose all day long. This is important because your muscles need energy for breathing and moving all day long: even if you are asleep, sitting in class or watching TV.
Basal insulin has other names too. You may hear people call it background or long acting insulin. Examples are Levemir and Tresiba
Bolus insulin
The second type of insulin is called bolus insulin. Bolus means lump or chunk.
Ideally, you take this insulin 15 minutes before you eat a meal or a large snack. When you digest food, your blood glucose levels rise quickly. Bolus insulin lasts for about 2-3 hours. This lets all the glucose from your meal move out of your blood and into your muscles where it’s needed.
It takes insulin 15 minutes to reach every part of your body. This is why you take it 15 minutes early!
You will also take bolus insulin if your blood glucose is above your target range. This is called a correction bolus.
We will help you keep your blood glucose in your target range as much as possible because this is a safe and comfortable level for your body.
Insulin intake
- Your diabetes nurse will tell you how much basal insulin to take.
- At first, your diabetes nurse will tell you how much bolus inulin to take before meals.
- Once you are carb-counting, there are Apps you can use to help work out your bolus insulin doses.
Basal insulin
We will tell you how much basal insulin to take when you are first diagnosed. We will help you to work out when changes are needed to keep your blood glucose in your target range.
Bolus insulin
You take bolus insulin for two reasons:
- Meal Bolus – to convert your food to energy
The amount of meal bolus insulin you take depends on two things:
• The amount of carbohydrates in the food you are about to eat
• Your personalized Insulin: carbohydrate ratios (ICR). This adjusts for how much insulin your body uses to process the carbohydrates you eatYour diabetes dietitian will teach you how to work out your meal bolus dose of insulin. - Correction Bolus – to “correct” your blood glucose if it is too high
The amount of correction bolus insulin you take depends on two things:
• How high your blood glucose is above your target range
• Your personalized insulin sensitivity factor (ISF). This adjusts for how much your blood glucose drops when you take 1 unit of insulin. We sometimes call this a correction factor.Your diabetes nurse will teach you how to work to work out your correction bolus dose of insulin.
Why do I need personalised adjustments?
Each person’s body responds differently to insulin.
We collect all the information you share with us about blood glucose, carbohydrates and Insulin doses. We use this information to work out personalized adjustment factors individual to you.
This means that your insulin can be as effective as possible, your blood glucose can stay in range more of the time, you will feel better and you can protect your long-term health.
Your personalised adjustment factors will change over time, we will help you to make changes so that your diabetes management system works for you.
Correction Bolus
If your blood glucose is over its target range or if you have ketones you may need a correction dose of bolus insulin. Only give a correction if it’s more than 2 hours since you last took insulin.
First work out how much 1 unit of insulin will drop your Blood Glucose
- Add up your total daily dose (TDD) of insulinMy total daily dose (TDD) = Basal + breakfast bolus + lunch bolus + dinner bolus
- Divide 100 by your TDDDivide 100 by TDD to find Insulin sensitivity factor (ISF)
Now, work out how many units of insulin you need to get your BG back in target range
- Work out how much your blood glucose needs to drop (blood glucose drop)
- Divide the blood glucose drop by the effect of 1 unit of insulin
Remember your TDD will change over time – so you will need to recalculate it
Example
Before lunch, Jenna tests her BG and finds it is 15mmol/mol. She usually takes 7u basal insulin at night time. She also takes 3 units bolus at breakfast, 2 units at lunchtime and 3 units at dinner.
How much insulin should she take now as a correction bolus?
First work out Jenna’s ISF, this is how much 1 unit of insulin will drop Jenna’s Blood Glucose:
- Add up Jenna’s total daily dose (TDD) of insulinTDD = Basal + breakfast bolus + lunch bolus + dinner bolusTDD = 7 + 3 + 2 + 3TDD = 15 units
- Divide 100 by Jenna’s TDD to find Jenna’s Insulin sensitivity factor (ISF)ISF = 100 / TDDISF = 100 / 15ISF = 6.7
- Work out how much Jenna’s blood glucose needs to drop byBlood glucose drop = Jenna’s Current BG – Jenna’s Target BG (usually 8)Blood glucose drop = 15 – 8Blood glucose drop = 7 mmol/molJenna needs her blood glucose to drop by 7 mmol/mol
- Divide the blood glucose drop by the effect of 1 unit of insulinCorrection bolus Jenna needs to take = blood glucose drop / ISFCorrection bolus Jenna needs to take = 7 / 6.7Correction bolus Jenna needs to take = 1 units
Taking insulin
- You will take your bolus and basal insulin by using an insulin pen
- You will have a different pen for each insulin
- Your nurse will teach you how to do this, or watch the Digibete video
1) By insulin pen
Prepare for the injection:
- You will need the insulin pen, pen needle and a sharps container.
- Remove the insulin pen cover.
Attach a new pen needle:
- Remove the paper tab from the needle and throw it away.
- Screw the needle onto the pen.
- Pull off the outer shield of the needle and set aside.
- Pull off the inner shield and throw it away.
Prime the pen: Always prime the pen before each injection
- Select the dose of 2 units using the dial at the top of the pen
- Hold the pen with the needle pointing upwards and press the injection button.
- Check that a drop of insulin comes out of the needle
- The dose window will reset to zero.
Select the dose to administer:
- Check that the dose window is set to zero after priming the pen
- Then adjust the pen to the dose you want
Inject the dose:
- Hold the pen firmly near the top
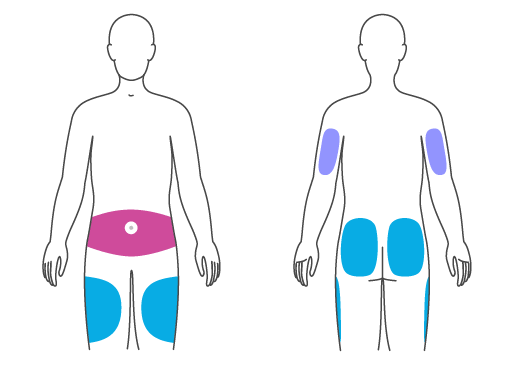
- Choose your injection site: back of arms, tummy, upper thighs or outer buttocks
- Take a small pinch of the skin
- Push the pen needle into the skin at a 90 degree angle
- Press the button firmly down all the way, and count to ten while holding it in that position in the skin. This is to make sure the whole dose of insulin goes into your body.
Remove the pen needle from the pen:
- Place the pen on a flat surface and guide the pen needle back into its outer shield that you set aside at the start.
- Use the outer shield to unscrew the needle, turning anticlockwise, and put the needle into the sharps container.
- Remove the pen needle from the pen after every injection and store it without a pen needle attached.
- Attach the pen cover and store at room temperature. N.B. if you are using an insulin pen you can keep it out of the fridge for up to a month. Put a date on the pen to show when it was taken out of the fridge and throw it away as soon as a month has passed.
Where can I give the insulin?
There are lots of places on you body where you can give insulin
Practice using all the different injection sites highlighted below.
Once you have tried them all a few times to get used to each one: use this approach:
- Choose one area at a time
- Make sure each injection is about two finger-widths from the last injection site
- Try to work in straight rows
- Use all possible sites in an area before moving to the next.
Remember:
- Use a different injection site each time. If a site gets lumpy it stops the insulin being absorbed properly.
- Use a new needle for every injection because used needles hurt, they can damage your skin and they can get clogged up and not give the insulin properly.
2) By insulin pump
- An insulin pump can make life easier and improve your diabetes control
- To use a pump you must show that you can carb count, keep in touch with your nurse and test your blood glucose at least 5 times a day
An insulin pump is a small device which sticks onto your skin. It puts insulin into your body through a tiny tube called a cannula.
An insulin pump replaces your usual once a day basal insulin dose by giving you a constant, low-level flow of insulin all day and night.
The pump can also give bolus insulin for a meal or snack; or for a correction dose if your blood glucose level is above your target range. To give the bolus insulin you must tell the pump your blood glucose level and the amount of carbohydrate you are about to eat.
All pumps consist of:
- a controller – you use this to tell the pump what to do
- a reservoir – this holds all the insulin you need for 3 days
- a cannula – this is a small tube which sits under your skin and lets the insulin into your body
- a pump – this moves the insulin from the reservoir, through the cannula and into your body
There are two types of insulin pump:
- a tethered pump
- a patch pump
Tethered insulin pump
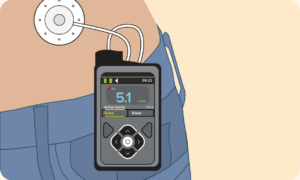
With a tethered pump, the cannula attaches to your skin and the pump attaches to the cannula by a small tube.
The insulin reservoir is inside the pump which also has all the controls on it. The pump can be carried on your belt, in a pocket, or in a body band. You can wear it under your clothes if you don’t want people to see it.
Tethered pumps can have different colours, screen sizes or extra features like Bluetooth remotes. Eg:
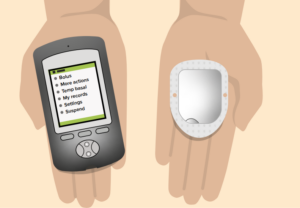
Patch insulin pump
With patch pumps, the pump, cannula and insulin reservoir are all in one pod which attaches directly on to your skin: usually on your legs, arms or stomachs.
The controller is on a separate handset, which connects to the pump via Bluetooth.
Patch pumps are disposable. You change the whole pod when the pump tells you to.
- Eg: Omnipod
How do I qualify for an insulin pump?
All young people are eligible to request an insulin pump. To get approval you must show that you can use the pump safely.
You must be able to:
- test your blood glucose regularly
- keep in touch with the team regularly
- work out your insulin doses by
- counting the carbohydrates in your food
- using your personalised correction factors
If you would like to try a pump, visit the manufacturer websites for more information and speak to your diabetes nurse.
We will show you the pumps we offer and together we can work out which will be best for you. You will be able to try the pump before you make your decision.
We will teach you how to use the pump and change the cannula yourself. This takes a little practice but eventually becomes easier. You will change your cannula every two or three days and move it to a different place. This is to keep your skin healthy and to keep the pump working properly.
Visit the technology page on Digibete for great information on what’s available
Scroll down the page to access all the information and to see the information in 11 different languages.
Storing insulin
- You can keep insulin at room temperature for one month.
- Protect your insulin from bright light and heat.
- Keep spare insulin in the fridge.
- Do NOT use insulin that has past its expiry date.
- Throw away any insulin that has frozen.
The insulin you are using can be kept with you at room temperature but you must:
- Keep it away from bright light and strong heat
- Keep the cap on the pen to protect it from light
- Levemir can be kept out of the fridge for 6 weeks
- Tresiba can be kept out of the fridge for 8 weeks
- Humalog can be kept out of the fridge for 4 weeks
- Novorapid can be kept out of the fridge for 4 weeks
After this time, throw away the insulin, even if there is some left.
You must keep spare pens and cartridges in the fridge to keep them fresh. Keep them away from freezer compartments. If the insulin freezes you must dispose of it immediately.
Always check the expiry date of insulin before you use it. You must dispose of any insulin that has gone past its expiry date.
The importance of checking blood glucose
- Checking your blood glucose tells you how much insulin you need to take.
- It also tells you if you need a snack or hypo treatment.
Checking your blood glucose is a very important part of your diabetes management system.
Because your body can’t make insulin you need to help it out by checking your blood glucose and working out what to do.
The blood glucose information you collect also helps us adjust your treatment as needed.
How often do I check my blood glucose?
You will check at least 5 times a day:
- When you wake up
- before each meal, (to help work out how much insulin to give before the meal)
- before bed (to help keep your blood glucose in its target range over night)
and also:
- before exercise (to make sure your body has the right mix of glucose and insulin to give you enough energy for the activity)
- if you feel you blood glucose might be low (to make sure your blood glucose doesn’t go too low)
- if you are feeling unwell (when you are ill your blood glucose can go up and down without warning)
Write your blood glucose readings in the record book you got in your starter pack. Or, if you have continuous glucose monitoring, upload your readings to the App/website. This is so that we can see how well your diabetes treatment is working for you. Then we can help you make changes as needed.
What is my target range?
If your blood glucose falls too low, you won’t have enough energy. If your blood glucose is too high, it can damage your blood vessels.
To help your blood glucose stay in a range that keeps your body happy and healthy we usually aim for your blood glucose levels to be:
- Between 4 – 7mmol/L when you wake up and before meals
- Between 5 – 9mmol/L after your meals
- Above 5 when you go to bed
- Above 5 before doing exercise
- Above 5mmol/L before driving, if you are old enough.
Checking blood glucose
- There are two ways to check your blood glucose. You can use finger prick testing and / or a continuous glucose monitor (CGM)
Everyone will use the finger prick method. This is the most accurate way to check blood glucose levels.
1) Finger prick testing
We will give you a blood glucose meter for finger prick testing. You will also be offered continuous glucose monitoring (CGM).
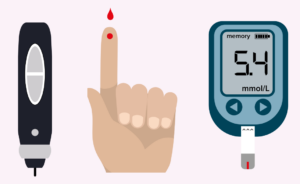
To use the finger prick method, you use a device called a finger-pricker or lancing device to let a little blood out of your finger.
You soak up the drop of blood onto a test strip placed inside a blood glucose meter.
The blood glucose meter will show you your blood glucose level which you can then record in an app or write down in your blood glucose diary to share with your diabetes team
To test your blood glucose levels with the finger prick method you will need:
- Blood glucose meter
- Blood glucose test strips
- Finger-pricker device (lancing device)
- Lancets
How to test your blood glucose with the finger prick method:
- Wash your hands in soap and warm water
- Dry your hands thoroughly (Damp hands can give a wrong, low reading)
- Put a fresh blood glucose test strip into the blood glucose meter
- Put a lancet into the lancing device
- Prick your finger (Don’t squeeze your finger)
- Put the blood onto the test strip
- Record the result in your blood glucose diary
- Throw away the used lancet and test strip in the sharps bin
2) Continuous Glucose Monitoring (CGM)
Continuous Glucose Monitoring checks your glucose levels every minute.
A small sensor sticks to your skin, usually on the back of your arm. The device has a tiny flexible probe which sits under your skin and measures the glucose levels there.
CGM devices measure the glucose levels in your skin fluid (it’s called interstitial fluid). This glucose level here is slightly different to your blood glucose levels and the reading here can lag about 10 minutes behind your blood glucose.
So even when you are using CGM, you will still sometimes need to finger prick to double check the CGM readings, but this usually only happens if your blood glucose is going out of your target range.
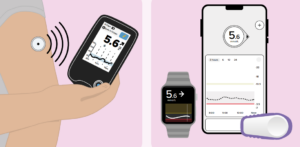
CGM devices store all of your glucose readings day and night. This means you and your diabetes team can see exactly how your body is responding to the insulin and make changes to increase the amount of time your blood glucose stays inside its target range.
Each CGM sensor lasts between 5 – 15 days depending on the make and they are all waterproof.
